When developing a Quality Management System, companies often struggle with the calibration requirement and the expectations that surround it. As a matter of fact, because it is misunderstood, people try to exclude it as fast as you can say calibration. Let us attempt to explain what calibration is, why it is important, what is required by ISO 9001:2015 and some common pitfalls while implementing this requirement. In this article, Factor Quality keeps it as simple and relatable as possible so you can easily understand the concept of Calibration and it’s importance.
“One accurate measurement is worth a thousand expert opinions.”
– Rear Admiral Grace Hopper
Why is Calibration important?
Let us give you 2 great examples of why calibration is such an important activity of your business:
- Imagine weighing 10 lbs. of screws and shipping it to a customer.
When the customer receives it, they weigh the screws at 8 lbs. Expect this customer to complain. When they do, you will have to investigate what happened and resolve the matter promptly. So, what happened? Is your scale accurate? Is their scale accurate? The only thing that you know with certainty is that you have essentially cheated your customer unknowingly. Calibrating your tools and equipment should give you the confidence that your devices are measuring, in this case weighing, the way they are supposed to.
- You buy a piece of furniture that is supposed to fit at a specific spot at home.
Only to find out that when you put it together the furniture is too big for the area. It makes you wonder if the dimensions were published correctly or if the pieces of furniture were measured correctly.
Measurements can become more critical when we are talking about items in the medical, automotive & aerospace industries. A piston that is too heavy in racing can slow the car down. A part that does not measure as expected will not work in a satellite and potentially delay a launch. A catheter size change could potentially be damaging to a patient.
Calibration is needed to help us confirm that the measurements we perform are being done with accurate devices.
It is a concept that has been around shortly after civilizations were started. Measurements were needed to calculate weights and lengths for early trades- calibration was done of devices to ensure fair trade. As time went by and technology evolved other measurements and means to ensure accuracy were introduced.
As inventions have evolved over time the demand on accuracy has also increased. When we say “lighter, faster, better!” Somehow these items must be measured to validate the statement. If you think about it, calibration is quietly a key component of any economy and hence it ought to be considered a key component of businesses.
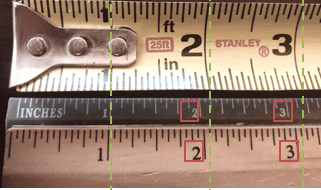 In this image, you will notice that at 1 inch, all rulers are measuring the same. But look at the 2- & 3-inch marks? They are all different. Which is the right measurement?
The quote by Rear Admiral Grace Hopper now makes more sense, right? It is extremely important to have a measuring device that you can rely on.
“One accurate measurement is worth a thousand expert opinions.”
Okay, I get it is important, but what is calibration?
Calibration simply put is ensuring a measurement meets a known standard.
So, let’s dissect this statement.
What do we mean by known standard? A known calibration standard.
What is a known calibration standard? An object with a universally recognized value (for example a centimetre, a millimetre, a kilo, etcetera). Normally these standards are traceable to a national agency. Here in the US, we use the National Institute of Standards and Technology, NIST. Therefore, most organizations in the USA use the term “NIST traceable” when speaking about their measurement devices.
How do you ensure it is meeting that standard?
The idea is that the device used (ruler, calliper, micrometre, scales, etcetera) gives you the certainty that your measurements are accurate. The act of calibrating means that you are verifying the tool to see if it meets those standards. If it does not meet the standard, then you will need to adjust, fix or scrap the item.
Since the introduction of Quality Systems calibration requirements have been present. In ISO 9001:2015, the requirement is called “Measurement Traceability” and calibration is a component of this requirement. It is written in such a manner that your company needs to first decide if “measurement traceability” is a requirement that applies to your company. It is quite possible to have businesses where no measurement devices are used (mostly service organizations). If that is the case, then you can deem the requirement as not applicable to the business.
For those companies that do have measuring devices then the question becomes “What items require calibration?” Normally we like to say that there are two categories:
- Equipment used to approve products- usually, this equipment that is carried by Quality personnel in the organization and it is used to determine if the product meets requirements at any point of the manufacturing or realization process. Not just final inspection.
- Equipment that is used to monitor a key factor in the process- a means to assure the process is performing as needed. An example of this can be a thermometer for a furnace where the temperature has been determined to be a critical factor in the process.
What are the ISO 9001 Requirements?
The intent of the calibration requirement is that, once you determined you have equipment/devices that need to be calibrated that you need to control it. What does this control mean?
It means that:
- you identify these devices, so you are aware of their calibration status;
- these devices are handled with care as not to affect their accuracy;
- you retain proof that these devices have indeed been calibrated.
Calibration Program Setting & Management
Managing a calibration program can be a costly expense to any business. Not only from the out-of-pocket expense of sending out items to get calibrated at a defined frequency but also the time it takes to manage the program. By the way, ISO 9001:2015 never defines the frequency of calibration for any given device. Some companies do counter the expense of external calibration by doing it themselves. Maintaining a calibration program can be achieved by using simple spreadsheets. We have seen software packages that help you manage, remind you and keep records of calibration activities. There are some calibration houses that have started offering “calibration data” solutions.
The most common pitfalls of calibration programs:
1. Dealing with out of tolerance items.
Many organizations do not deal with “Out of Tolerance” items. Small businesses are often happy to receive their calibration certificates and quickly file them without taking a close look at them. But if you do not read it properly, you might miss that the calibration house notified you about an item being out of tolerance. Luckily, nowadays the calibration companies do not only report it on the certificate, but they also provide a quote for the adjustment/ fix.
If you used an item that was out of tolerance you need to know the effects of the failure. People forget to analyze if the “Out of Tolerance” condition could have affected any of the measurements taken with the device. If the out of tolerance item does not affect your products then, no need to do more. However, if the out of tolerance device affects your product then you might have your hands full trying to figure out what product(s) were measured with the device and how far back in time you need to go to assess product quality. This might even have you recalling the product to ensure it is safe.
2. Proper handling of measurement devices.
For example, what if someone was to bump into equipment X and it falls onto the floor? Do you need to know as soon as it happens? Yes! It is extremely important to verify that the calibrated item still functions as expected. If not, you would have to deal with the consequences. Normally, months later, through a customer return/ complaint or through an Out of Tolerance condition detected at calibration that you will need to investigate. Another frequent calibration pitfall is that items are not identified properly to show their calibration status. Calibration stickers are the easiest way to identify your equipment and tools. The picture here is a snapshot of items you can find in google when searching for “calibration stickers”. You choose which best suits your organization and then start using it on all items that are calibrated. This is an easy way for everyone to know when to get the item calibrated.
3. Calibrated equipment missing proper identification.
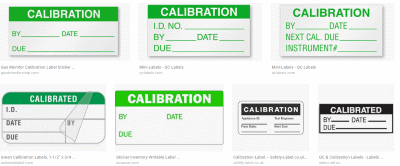 Calibration stickers are the easiest way to identify your equipment and tools. The picture here is a snapshot of items you can find in google when searching for “calibration stickers”. You choose which best suits your organization and then start using it on all items that are calibrated. This is an easy way for everyone to know when to get the item calibrated.
Some companies identify measuring devices with stickers that state “For Reference Only”. This is an acceptable practice if the device is not being used to determine if the product/ test is viable or not. The litmus test comes when auditors ask the employee how they use device “X” and what decisions they might make based on the device readings.
Now granted calibration stickers can fall off, especially if the devices are being used in an environment where the stickers are being exposed to chemicals or are prone to wear due to use. So, some companies keep the status of their calibrations using alternate methods. Which is fine, but you must prove that they make sense for your organization.
Need More Help?
We understand that you might still have questions at the end of this blog and might not know where to start when creating your calibration system.
Don’t stress! We get it!
Factor Quality is here to help!
 We can come in or meet online and check if your organization is calibrating the right items and controlling them correctly? We have vast experience setting up calibration systems that make sense and are sustainable. One size does not fit all and we are here to help you determine what fits your organization.
Check out our Process Improvements services but remember that we can always add a la carte services to ensure more value for you. We are not about just charging you money, we are here to ensure we make your QMS better. That is our goal.
About the Author
Pierre Servan | CEO, Principal Consultant, Factor Quality Inc.
Factor Quality was founded in 2011, with a vision to help fix quality issues, improve businesses, and help them get certified. Pierre never thought he would encounter such a rewarding industry with clients that appreciated his work, students that appreciated his words, partners that helped him and consultants/colleagues that appreciated him and what he had to say. Today, Factor Quality helps organizations take the next step in their quality journey and service the following certification: ISO 9001, ISO 14001, ISO 13485, ISO 16949, ISO 17025, ISO 45001, AS9100, AS9110 & AS9120. If you are interested in learning more about Factory Quality, visit them at www.factorquality.com/



 In this image, you will notice that at 1 inch, all rulers are measuring the same. But look at the 2- & 3-inch marks? They are all different. Which is the right measurement?
 Calibration stickers are the easiest way to identify your equipment and tools. The picture here is a snapshot of items you can find in google when searching for “calibration stickers”. You choose which best suits your organization and then start using it on all items that are calibrated. This is an easy way for everyone to know when to get the item calibrated.

